Gardening is a practice that can be therapeutic on so many levels. Gardening is medicine. It can connect us to the earth and ourselves in a very deep way, a way we will only begin to understand once we partake in the magic. –Sheila Coughlin
Spring has arrived, and my family’s greenhouse is getting ready for the growing season. We have the plastic up and the propagation bed is filling up with plug trays filled with sprouting seeds. I wanted to take time out of the busy greenhouse preparations to write a post to give some pointers on getting started with native plant gardening. Whether you’re a beginning native plant gardener or have some experience, I hope this post gives some ideas and inspires you to get thinking about this year’s native plant garden. Please, share in with your comments. It’s great hearing from readers with ideas and experiences.
Ready to get Started with Native Plant Gardening?
Site Evaluation
First of all, you’ll want to consider your site. Put some thought and research into potential sites and find a suitable sized piece of earth that would benefit from a native plant restoration project. This could be a portion of your yard, an alleyway, or a community space that you’ve received permission to plant on. You need not have a huge chunk of land. In deciding where you’ll have your native plant garden, make sure it is free from toxic chemicals or pollution that would be harmful to the wildlife that will be visiting. This is also important if you choose to harvest some of the plants for food or medicine. Evaluate your potential sites and decide upon which will be most suitable to your garden type and give a nice home to the potential plants you have in mind for planting. Fine sandy loam, loam, or silt loam are the most ideal soil textures. Don’t forget to ask the land and look to nature for inspiration.
Once you have your site chosen, take a good look around and start thinking about the space you have to work with. Take notes on the measurements of the site, and its specific environment. Note the amount of sunlight the site gets each day, the moisture level in the soil, and the soil type. If you have concerns about the soil’s PH or if you want to make sure it is not depleted in Nitrogen, Phosphorus, or Potassium, you can do a simple soil test. I get the Rapitest Soil Test Kit which is really simple and seems to be pretty accurate. If you’d rather reach out for assistance with soil testing, do so. There are usually local services that can help you in doing so. In Minnesota, the Soil Testing Laboratory through the University of Minnesota is a helpful resource. You will also want to Click Before You Dig to find out who to contact to make sure it is safe to dig and that there are no buried utility lines. They won’t know where your private lines are, so be sure to consider those as well.
Project Planning
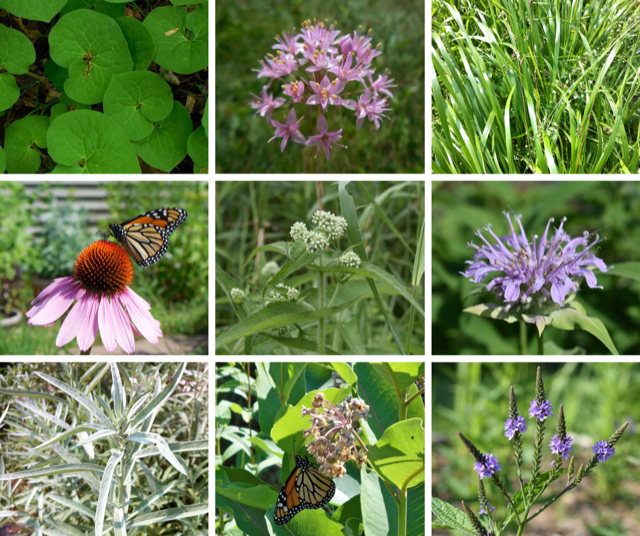
Now, it’s time to start planning your project. If you haven’t already, do a bit of research on which native plants would do best for your site or ask your local native plant nursery for their recommendations. Again, remember to ask the land that you will be working with and let your intuition be your guide. I’ve spent quite a bit of time looking to the native plant communities in my area for inspiration. It’s a good way to think about how you will truly work with the land and create a garden that works with nature instead of against it. Get inspired by the native plant landscapes near you.
I’m not going to get into specific native plants in this post, since the plants native to my area may not be native where you live. They could even be invasive, noxious, and trouble-some to plant in your area. It’s really important to do your research to make sure the plants you choose are OK to plant in your state and planting zone. Check the USDA Plants Database. It’s a great resource. The map is really helpful in finding the range of a specific plant. Just type in your plant’s common or scientific name to do a search. Following is a list of other things you may want to consider in planning your project. Have fun and get creative planning!
- What will your project timeline be?
- Cost? Do financial planning.
- Which plants will stay?
- What’s your soil texture? Clay, sand, silt, or loam. Check out below video to analyze.
- How will you prep? Remove sod by hand, kill turf with plastic, or build on top of?
- Will you need to amend your soil?
- Which plants will you plant specific to the light, soil type, and moisture level?
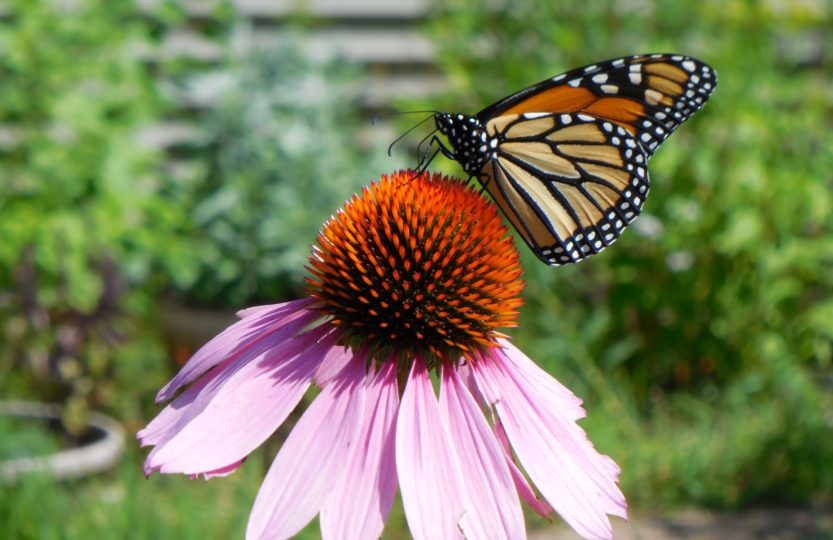
- Are there specific visitors you will be planting for? Bees, butterflies, birds, etc.
- What will your plant placement be according to plant size, color, and bloom time? Spacing?
- What will the lay-out look like? Draw it out on graph paper with dimensions.
Video by: UCDavisIPO
Site Preparation
If you have time, you can lay clear plastic for a few months to kill the grass and weeds. Then, till up and further prepare the ground. This process is called soil solarization. Another option if you have a bit of time is lasagna beds. Simply, place cardboard over the place you intend to plant and begin laying down layers of browns and greens. Then, mulch and let the materials break down. If you do this in the fall with fallen leaves, yard clippings, and other materials, it should be ready for springtime planting. Not disturbing the soil ecology with this method really has its benefits. There are a lot of amazing things going on beneath that soil.
If you don’t have a lot of time, you can simply remove the sod with a shovel or sod removal tools. You can also use a tiller to remove the sod by going over it several times. Should you choose the tilling method, you will be dealing with more weeds throughout the year. Mulching after planting does help with weeds, though. Before adding topsoil or planting, make sure to deeply till the area you have prepped. This will prevent compaction. Water flow and root development is impacted when compaction is a problem.
Building a bed on top of the sod is another option when working on a short timeline. Place pieces of cardboard on top of the area you plan to have your garden, add your soil on top of it, and plant. Make sure it is plenty deep. If you would like a defined edge to your garden around the perimeter, place large rocks, upcycled materials that won’t leach toxic chemicals, or collect large pieces of driftwood. Get creative with natural materials you may find or have on hand. By building your bed on top, the cardboard will eventually breakdown as will the sod. The roots of the native plants will love to work their way into that composted material and the rich, undisturbed soil beneath.
Now, let’s return to looking at the soil. We talked about this briefly when we talked about choosing our site. If you have sandy or clay soils and have chosen species well-suited to your site, you will not need to amend. Sandy soils will otherwise need to have its ability to hold water improved. Clay soils will need drainage and aeration improved. You can do this by adding in organic amendments such as compost or manure. Even if you do not need to amend your soil, it can be good to put a little organic matter on top of your prepped and deep-tilled garden bed. Outside of this basic amending, you really don’t need to add anything unless you chose to soil test and the test came up deficient. Plants need Potassium for their blossoms, Nitrogen for their leaves, and Phosphorus for their roots. The PH may also need to be raised or lowered depending on your species selection. Make sure to find and use environmentally friendly amendments, if you do need to amend. Landscaping with Native Plants of Gardening of Minnesota, by Lynn M. Steiner, has some good tips on soil amending.


*This post contains affiliate links. A small percentage of all the purchases you make by following the above links will help support this site. Thank you for choosing to support Nature Art Exploration!*
Planting and Maintaining the Site
Native plants can be planted from spring to fall in Minnesota. Follow the suggested spacing specific to each plant and the general layout from your garden plan. Spacing information can be found online or requested from your local native plant nursery. The seed company I go through, Prairie Moon Nursery, has great spacing information. I use the information found on their website as a suggested spacing guideline. After planting your garden, a few inches of mulch will help retain water, decrease weeds, and help prevent erosion. It will also give the plants protection against temperature extremes. You can use organic matter such as leaves, grass clippings, wood chips, or clean straw. The plants that are indigenous to your area are also adapted to your soil and climate. If you’ve matched your plants to the right moisture level present in the soil, extra watering in not usually necessary once they’ve become established. Make sure to water after planting, and continue to water routinely until they become established.
Keeping up on weeding will ensure that the native plants will not get overtaken and crowded out. Other basic maintenance includes pruning, dividing, or staking dependent on the species you’ve selected and their individual needs. Learn about the plant who chose you and how you can best help them grow! If you matched your plants well to the site, you usually do not need to use fertilizer. I don’t recommend pesticides or herbicides in your native plant garden. These are harmful to the wildlife and environment. Make choices that keep the earth in mind! I always clean up the garden and get ready for new growth in the spring. I never cut down my plants in the fall. It’s a good idea to leave them over winter for the birds and other wildlife. They also add color and interest. The maintenance for native plant gardens is really much easier than other gardens. Cut down on lawn maintenance, and enjoy the bees, butterflies, hummingbirds, and other wildlife that frequent your native plant garden! For more reading on the topic of native plant landscaping, check out Living Landscapes in Minnesota: A Guide to Native Plant Landscaping. It’s a helpful guide and was helpful to use as a reference in writing this post.
Nature Art Exploration hopes this post has been helpful with getting started on your native plant garden this spring. Check out the recent post, Native Plant Gardening: Benefits and Garden Types, to learn more about the benefits of native plant gardens along with some ideas on garden types. You may also want to learn about how you and your family can get started with Creating a Family Butterfly Garden. Thank you for joining us today. Please, feel free to comment below to share in on the explorations. Nature Art Exploration loves hearing from readers!
Sheila…All your helpful info REALLY makes me want to get out and garden NOW! I just love spring and the “rebirth” of all my plants. I also look forward to adding to some new greenery to some of my new planting areas. The season goes by so quickly that I hope the weather warms consistently here “soon” so I can get the “show in the road!” Ha! Thanks and happy gardening to you!☺️
Happy gardening to you as well Carol! So glad you enjoyed the post. Enjoy the sunshine and time outside connecting with the earth!