Several months ago, there was a moment of clarity in my life that gave me the realization I needed to get back to a more artful life. I was at a place where I was doing everything for everyone else but forgetting to nourish my own inner garden of creativity. This garden hadn’t been watered in a long time, and it felt like my well of creativity had completely dried up regarding the things I wanted to creatively pursue. I was stuck, and my creativity was screaming to be let out. Sure, I had channeled creative energy into projects with my child whom I home-school and sat down helping him with art, building, and other creative interests he pursues. My own creative projects, though, had been long forgotten inside my art cupboard where stacks of “to dos” barricaded my entrance. I knew something had to change. I had to create a place where I could nourish my creative energy and have projects going on that I could share with the world. This was the beginnings of the Nature Art Exploration website.
Part of my individualized major in college focused on Art Therapy blended with Ecospychology. It was a wonderful experience that helped redirect my thoughts surrounding art from one of creating art for visual beauty to one that gave an outlet of self-expression and inner healing. This is the place that I create art from now. I believe that every person has an artist who wants to emerge. To me, art is not about getting things just right and perfectly capturing an image in art form. It’s more of a process that helps me to learn more about myself, my connection to the world around me, and where I am at in life. Sure, there is a finished product, an end result that goes along with the project, but to me, the process is by far the most important part. It gives me insights into my being that otherwise escape my conscious awareness.
For my first project here, I want to share my love of creating mandalas and blend this with my love for using natural materials and found objects in my art. Creating mandalas can be a relaxing way to relieve stress and to re-focus the mind. Strongly rooted in Buddhism and Hinduism, Traditional Mandalas have cultural origins and are practiced as parts of religious ceremonies. The name mandala comes from the Sanskrit word for circle. If you’re interested in learning more about mandalas across the cultures, Mandalas for the Soul website has great information on cultural mandalas. The mandala we will be creating in the following project is an example of a Modern Mandala but with a twist of nature. The Modern Mandalas that you see commonly in the Western world have become a method of relaxation and de-stressing. Adult coloring books and methods of creating mandalas have become popularized through the incorporation of the maṇḍala into the western world. The well-known psychologist Carl Jung began this movement westward using it in more of a therapeutic context with his clients in the early 1900s.
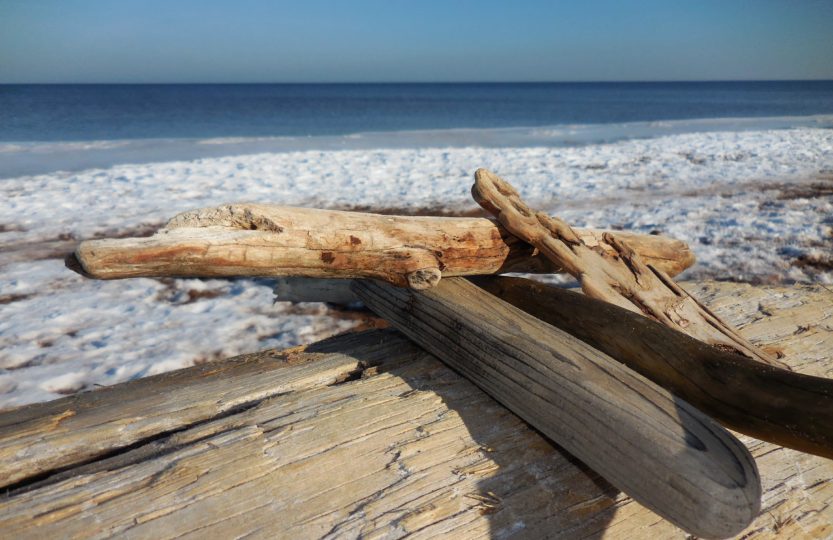
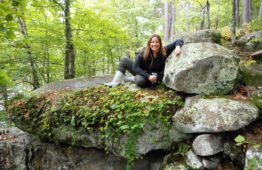
As I mentioned before, the process of creating art is the most important part to me. By incorporating natural found objects such as stones, driftwood, feathers, and other materials, I feel like the insights I gained in the process of acquiring the materials are melded into my art piece. It gives voice to the messages these gifts from nature bring to my creation. For me, some things can only be explained through art. Letting these materials express their beautiful message goes far beyond words. They speak for themselves. I also feel that through using natural found objects I am best able to express my connections with and relationship to mother earth. The lake stones I used for this project were collected on the shore of Lake Superior during my walk in the above picture. Being close to water, is always a healing place for me to be.
Following is a step-by-step description of how I created my “Lake Rock Mandala” pictured below. Recreating this project by designing your own mandala and utilizing your own natural, found objects would be AWESOME to see! Please share your pictures, insights, and other comments below in the comment section. Everyone here would love to see what you created!
Lake Rock Mandala
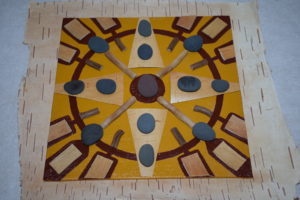
Lake Rock Mandala
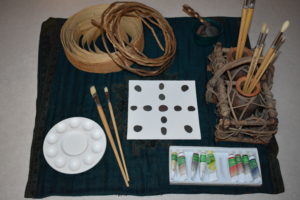
- Prior to creating my Lake Rock Mandala, I pulled out my collection of natural materials and possible canvases to work with. I also considered other potential materials that could serve as a canvas such as a large flat garden stone or natural looking, wooden board. I opted for using an 8 by 8 inch Blick Canvas Panel. Think about what would best serve as a “canvas” for your project.
- Next, I arranged the small, smooth lake stones I had chosen in a Mandala like pattern on the canvas arranging them in a potential pattern and picturing which color I felt called to paint the canvas background. For this project, I chose an acrylic color called Yellow Ochre from Art Advantage. What color will you choose to best express your project?
- Once you have a good vision for your project, prime your canvas as needed. Craftsy has a great tutorial for this.
- Next, I smoothly applied several coats of my chosen background color to my canvas making sure the color fully covered the canvas I was working on.
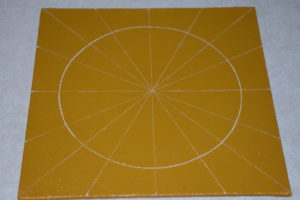
- With the canvas fully dried, I used a white charcoal pencil to mark lines on my canvas to serve as guidelines of symmetry for my mandala. Since I was using an 8 by 8 inch canvas, I used a ruler to measure 4 inches in and lightly marked the canvas with the charcoal. I repeated this on all sides of the canvas, and then, drew straight lines attaching the marks creating a cross like shape. I repeated the same process making a mark 2 inches away from each original mark and again connected the marks using the ruler to guide my charcoal in a straight line. The last marks I made ended up on the 4 corners of my square canvas. Once these were connected, I traced a circle with a Tupperware top in the middle of my canvas. At this point, my canvas looked like the below picture. This process of creating guidelines of symmetry for my mandala was inspired by Craftsy’s tutorial on mandala drawing.
- Next, I replaced my lake stones where I originally envisioned them and took out the other materials which I planned to use in the mandalas creation. This included a roll of black ash bark, spruce root, and birch bark that I had on hand. You could use any type of natural, found material that you have on hand or can sustainably acquire. Some other material ideas could be sticks, small pebbles of varying size, or feathers.
- Decided on the materials to use, I began cutting the root and bark into shapes that fit my chosen design visualizing where I would like to use paint and where I would like to fit natural material. I continued to cut and shape my project with the natural materials placing these in the desired pattern and marking open places where I wanted to paint with a darker brown color using my white charcoal pencil.
- Once this pattern was achieved, I removed the natural materials from the canvas and onto a paper plate careful not to shift anything. I, then, painted my dark brown portions of the mandala and applied a second coat as needed allowing for adequate drying time.
- Once everything was dry, I finished the project by gluing the natural materials onto the canvas in the prior chosen pattern completing the “Lake Rock Mandala.”
Art Therapist Cathy Malchiodi has some great insights about mandala drawing. Check out what she has to say about it on Psychology Today. If you would like to explore more, check out more at Mandalas for the Soul. It’s a really fun website to surf for information about mandalas.
These are so much fun to do! They were one of the creative exercises in a 7 weeks course I took called “Creative Revolution” (https://florabowley.com/online-learning/creative-revolution-ecourse/)… The way you (and the reason for) including natural objects really makes it even more meaningful for me. Thank you!
These ecourses look great! Thank you for sharing this. I had to watch this video 2 times. http://bit.ly/bloomtrueecoursevid I love how she paints with her finger tips and talks about letting go of expectations and what it is “supposed” to look like. Some of the painting gatherings with my friends become like this. There’s something about using my fingers in painting. It’s so freeing to get away from the shoulds and back to the flow. This inspired me to dive in further with painting with my fingers. Thank you!