This is Part 2 of Exploring Chaga. Don’t forget to check out Part 1 where we explore how to identify chaga and talk about benefits.
How do you Harvest and Store Chaga?
* The decision to harvest any wild mushroom or plant is one that only you can make. You are solely responsible for your own decisions in doing so. Thoroughly researching, cross-checking your identification, and verifying it with a professional is a wise decision. Always familiarize yourself with potential look-alikes, potential side-effects, and any herbal cautions that may apply to the wild food you are interested in harvesting. As writer of this blog, I hold no liability for your decision. I only share my own personal experiences and knowledge. Use utmost caution in your choice to harvest any wild food. If you choose to make the harvest, that is your own personal decision.

The best time to harvest chaga is in the winter-time when the birch tree has become dormant. This is when the nutrients contained in the chaga are at the highest. If you find chaga at other times of the year, return in the winter to harvest. I have only personally harvested from birch trees, and some sources report that the healing properties of the chaga mushroom are specific to those that grow on birch trees. Wait until the chaga is the size of a grapefruit before planning a harvest and only harvest from birch trees that are alive and in a pollution-free area. The higher up on the tree the better. You don’t want to harvest chaga that is too low to the ground.
Using a small axe and a hammer, tap the axe in a controlled manner careful not to cut into the tree’s heart wood. We harvest making sure to leave about 1/5 of the chaga growth on the tree. A birch tree infected with chaga can live for decades prior to dying. Harvesting the chaga properly, ensures that the birch tree can carry out its remaining life cycle and that the tree will continue producing chaga until it dies. You can return every several years to harvest it in a sustainable manner.
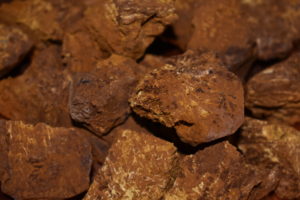
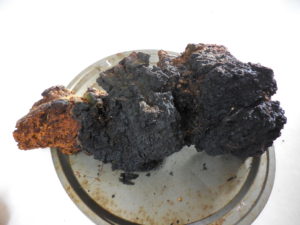 Once we get our chaga home, we start preparing it for storage right away. Chaga will mold if it is not taken care of promptly. Using a wood rasp, we remove the black charcoal-like outer covering. This is time consuming but with experience it goes a lot quicker. Be patient. Once your chaga has been properly prepared for storage, you will have an amazing superfood on hand in your cupboard. Once the hard, black outer crust is removed with the rasp, we cut the golden, yellow-brown interior into 1-2 inch piece chunks. If at any time during this preparation process you cut into a part of the chaga that is dark inside, you do not want to use this portion. Chaga turns dark inside when it dies. Do not use chaga that is not alive.
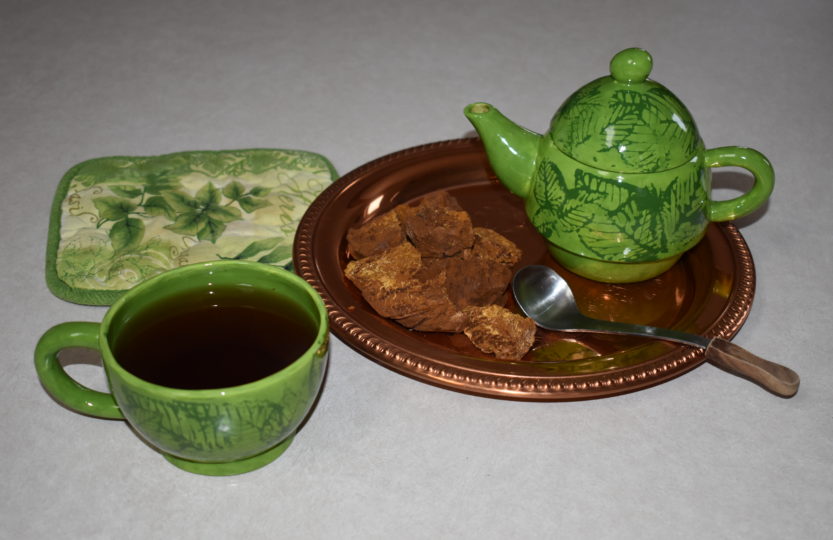
Once our golden chunks are cut into 1-2 inch pieces, we set up our dehydrator at 120 degrees and dehydrate it until fully dried. We, then, store our fully dehydrated chaga chunks in a storage container that has air flow such as a paper bag or box keeping it in a dark cupboard or other area that is moisture free. Chaga that has been properly prepared and stored will keep for two years retaining its medicinal properties.
How do you make a Simple Cup of Chaga Tea?
Chaga makes a wonderful tea year-round, but my favorite time to sit and sip chaga tea is in the winter-time. Being curled up by our wood-stove and sipping a warm cup of chaga tea is a delight that goes beyond compare. It gets me through the long winters of northern Minnesota. I dream about next summer’s foraging and harvesting adventures as I gaze into the fire sending out grateful thoughts for all of nature’s foods and medicines that keep us well. Here’s a great, simple recipe that we use around our house.
Whenever I try a new wild food or wild crafted medicine, I always start with trying only a small amount. Allergic reactions can happen to any new food or medicine. You should contact your doctor prior to starting on any herbal medicine. See what Medical News Today says in their article concerning the risks of chaga mushrooms.
Chaga Tea Recipe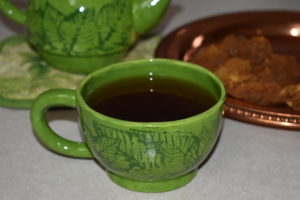
What you need:
6-8 cups of water
2-3 chunks of chaga
2-3 quart pot with a tight fitting lid
Maple syrup or honey for sweetening if desired. Chaga contains a natural vanillin giving it a wonderful, natural vanilla flavor. You may want to taste its flavor prior to adding anything.
Preparation:
- Fill your pot with the chaga chunks and water. Bring the water to a boil. If the amount of water used in this simple recipe seems like too much, feel free to half the recipe. Once the water begins to boil, remove it from the burner.
- Let it steep for 20 minutes or longer if you desire it to be stronger.
- Add maple syrup or honey if desired, but it really doesn’t need it.
- Sit down and enjoy!
Know that left-over chaga tea can be saved for a few days in the refrigerator. It can be nice to have extra to warm up throughout the day, but be mindful not to waste it. Some people make several batches of tea reusing the same chunks.