Morel Mushroom season is just around the corner in Minnesota, and shroomers across the state are getting excited! My family is fairly new to the hunt, so I’m definitely not an expert on finding them. Still, I want to share some on the Morel Mushroom from what I’ve learned over the past few years. Nature Art Exploration would love Morel hunters to join in on the comment section below with tips, recipes, or other information on morels. This space on the web is a place for learning and sharing!
Morel Mushrooms are a spring delicacy. In my opinion, their meaty texture and earthy, nutty taste is far supreme to that of other mushrooms. They have a very deep, woodsy flavor. There’s no wonder as to why so many catch Morel fever this time of year and hit the woods, pastures, and orchards in search of this prized mushroom. Let’s dive into learning about two types of Morels, Black Morels and Yellow Morels. We will also explore some great resources to get you started on the Morel hunt.
When Does the Morel Season Start?
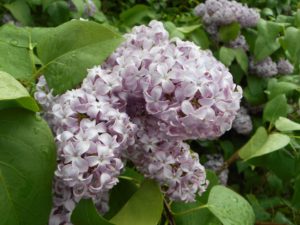 Morel season sweeps upward in the United States in the spring determined by weather factors and soil temperatures. Year to year, the time you find Morels will change, since they pop when weather conditions are just right. It’s a good time to head out on the hunt after a good spring rain when temperatures are in the 60s and 70s. In Minnesota, Morel season usually runs from late April to May depending on the weather. The season starts later farther north. Some people say, “When the lilacs are a blooming, it’s time to go shrooming!” I’ve been tracking the upward sweep of the Morel season on The Great Morel site. Check out this GREAT MAP of morel sightings that people have already posted this year! People submit morel sightings across the U.S.
What Habitats are Best to Search for Morels?
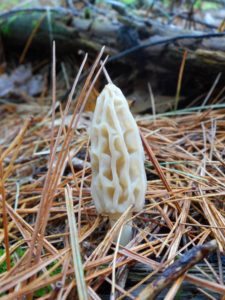
Morel mushrooms can be found growing around dead elm trees, floodplains of rivers, and old orchards. When they pop up around dead elms, you’ll usually find them in a 30 foot circumference 3-5 years after the tree has died. Looking in areas that had a forest fire the year before can also be a good place to look. Some of the Black Morels my family and I found last year were found in a coniferous forest where White Pines dominated along with some Red Pines. Finding a few areas to look and returning to these areas in prime weather conditions is a good start. Get out there on the hunt, and you’ll learn something new every year.
What are the Identifying Features and are there Look-a-Likes?
The Morchella genus has a variety of species. I will only be discussing two of these in this post, the Black Morel and Yellow Morel. These are the Morels I’m familiar with. I will also discuss look-a-likes. There is also a Half-free Morel which I won’t get into, since I am not personally familiar with them. However, they are covered on this Yellow Morel PDF from the University of Wisconsin Extension. It’s really helpful for identifying Morels including familiarizing yourself with look-a-likes. It’s a great PDF to use as a resource alongside some good mushroom identification guides.
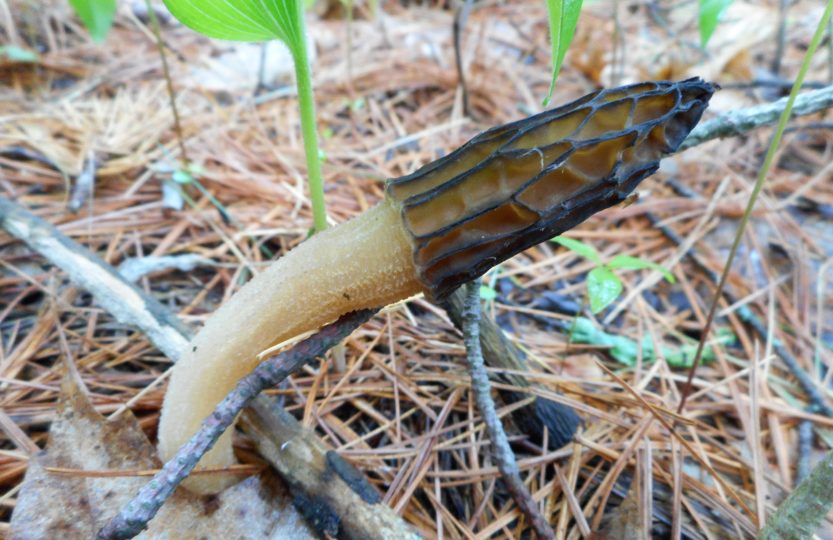
Before getting out on the hunt, familiarize yourself with the Verpa and Gyromitra genus. Both pop up around and during Morel season and can be mistaken for Morels by those new to Morel hunting. The first look-a-like my family and I found on the hunt was a False Morel of the Gyromitra genus. They can really throw you off if you don’t know what you are looking for. Know that False Morels, when cut in half vertically, are fleshy inside and chambered. They are not hollow. They range from reddish to brownish in color. Verpas which can also be confused are stuffed with a cotton-like material inside when cut open.
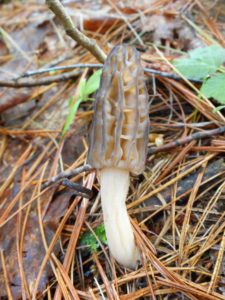
True Morels, both Black Morels and Yellow Morels, are completely hollow inside when cut open. The insides of the hollow interior are smooth. The exterior of the caps are sponge-like and appear honeycombed. Black Morels have pits and ridges on the caps which are darker on the ridges as compared to the pits. On the other hand, Yellow Morels, have pale ridges with darker pits. True Morels have these pits and ridges as opposed to the wrinkly, wavy, or folded caps of the look-a-likes. The stems of True Morels range from whitish to yellow and are lighter colored than the caps. The stems connect directly to the caps. The following pictures are a few of the Morels we found last year!
Use your mushroom identification guides to familiarize yourself with the characteristics of the Morchella, Verpa, and Gyromitra genus. Being 100% confident in your identification prior to harvest is essential.
What are Some Tips on Harvesting Morels?
* The decision to harvest any wild mushroom or plant is one that only you can make. You are solely responsible for your own decisions in doing so. Thoroughly researching, cross-checking your identification, and verifying it with a professional is a wise decision. Always familiarize yourself with potential look-alikes, potential side-effects, and any herbal cautions that may apply to the wild food you are interested in harvesting. As writer of this blog, I hold no liability for your decision. I only share my own personal experiences and knowledge. Use utmost caution in your choice to harvest any wild food. If you choose to make the harvest, that is your own personal decision.
Dress appropriately for your shrooming adventure with sturdy shoes and plenty of water. I always take a good compass, a breathable mesh bag or a basket, and a knife for harvesting. Only harvest from areas that are non-polluted away from areas where there may be contaminated run-off. Search in the prime areas that I discussed before, and crouch down low to scan the ground. Use a knife or pinch off the stem above ground level, being careful not to disturb the underground portion. The Morel Mushroom is actually the fruiting body of the underground mycelium, and the spores spread easily through the air.
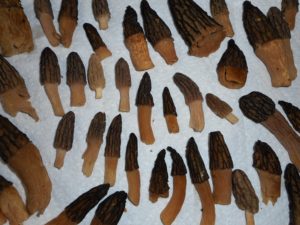 If you accidentally harvest any Morels that are wormy, old, or crumbly, return these to the earth. Collecting wormy Morels will only spread worms to other Morels you’ve collected. Once home, clean your mushrooms with a small brush, cut vertically to inspect the interiors, and properly store them. They will keep in a well ventilated space in the refrigerator for about a week. If you choose to keep them longer, dehydrate them fully for long-term storage. Dehydrated, they will keep for years. Just rehydrate them in water when you plan to use them. Morel mushrooms must always be cooked. Do not eat raw Morels.
What are Some Helpful Resources to get Started?
Many mushroom clubs, online resources, and other sources can be great go-tos to guide you on the hunt. Doing a search on the internet will land you with numerous resources. It’s fun to be part of a local mycology club, too! Do a search in your area, and see what you can find! Following are some great books out there on Morel Mushrooms to get you started. Nature Art Exploration also has a great book in the shop which covers 6 edible mushrooms that are easy to recognize and start with as a beginner. It includes the Morel Mushroom. Click HERE to shop now.


*This post contains affiliate links. A small percentage of all the purchases you make by following the above links will help support this site. Thank you for choosing to support Nature Art Exploration!*
Thank you for joining Nature Art Exploration! Many regard Morels as hard to find. Once you join the hunt, you’ll learn more and more each year about how to best locate good places to search for Morels and when to head out. Remember to always tread lightly on the earth and harvest responsibly. Please, share in with your adventures in the comments below. Nature Art Exploration loves hearing from you!